Tuesday Treats: One Aurifil size does NOT have to fit all (part 2)

Back in April I started a series about the different Cotton Mako’ thread weights to explain the place each thread weight can have in our textile tool kit.

The thread I wrote about then was Cotton Mako’ 40 , so this time I want to highlight what can be achieved with Cotton Mako’ 28.

Beautiful hand quilting by Judy Leckie

Beautiful hand quilting by Judy Leckie

Cotton Mako’ 28 is on the thicker side of the Cotton Mako’ range, making it perfect for traditional hand quilting.

I’ve always found that the threads, in other brands, that are especially treated for “hand” quilting  are stiff and springy and seem to have a mind of their own that doesn’t necessarily match with how I want the stitches to form.

So I love the way Cotton Mako’ 28 sits in the needle neatly, and the stitches form without any twisting or tangling.

More of Judy Leckie's beautiful hand quilting

More of Judy Leckie’s beautiful hand quilting

Like all the Mako’ range the 28 weight thread is mercerised, but does not have any of the waxing or glazing that can make those other threads so difficult to handle when hand quilting.

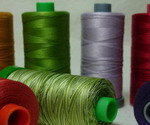
Cotton Mako' 28 is identified by the grey spool base.

Cotton Mako’ 28 is identified by the grey spool base.

Because the thread has not been waxed or glazed, Cotton Mako’ 28 is also suitable for use as a machine quilting thread.

In fact, it’s slightly thicker nature means that motifs and feature designs show up very nicely on the quilt top.

Machine Quilting motifs are clearly defined when stitched with Cotton Mako' 28

Machine Quilting motifs are clearly defined when stitched with Cotton Mako’ 28

However, I always think of Cotton Mako’ 28 as more than a quilting thread.

Try using it for hand & machine blanket stitch applique.

Hand blanket stitch with a single strand of cotton Mako' 28

Hand blanket stitch with a single strand of cotton Mako’ 28

or machine embroidery

Machine embroidery using Cotton Mako' 28

Machine embroidery using Cotton Mako’ 28

or hand embroidery.

My cross stitch has been stitched with a single strand of Cotton Mako’ 28 on size 14 Aida cloth.

Cross Stitch and hand embroidery using Cotton Mako' 28

Cross Stitch and hand embroidery using Cotton Mako’ 28

And the most surprising use of all, given the slightly thicker nature of the thread.

Some people choose it as their preferred hand piecing thread, especially if they use a small running stitch.

You can load the needle with many stitches when hand piecing with Cotton Mako' 28

You can load the needle with many stitches when hand piecing with Cotton Mako’ 28

So, like all the threads in the Cotton Mako’ range, the Mako’ 28 is very versatile.

Once you have some in your thread stash you will keep finding more and more reasons to use this great thread.

The Simply colour thread Collection by Vanessa Christenson of "V & Co"

The Simply Colour thread Collection by Vanessa Christenson of “V & Co”

Read more about Cotton Mako’ 28:

 A review of the Aurifil range by Alyssa

Using Cotton Mako’ 28 for Cross Stitch

A vote for hand stitching

Blue Christmas in July

I actually don’t like “Christmas in July” when it is offered as a theme or an occasion to celebrate Christmas.   I can see why it is popular in Australia – as July is mid winter and our Christmas is often celebrated when the temperatures are very hot. Memories come back to me of cooking (and eating) a roast dinner (Turkey with all the trimmings) when the day was 30 plus degrees! However, I digress —- I went to a weekend gathering of quilters where the theme was “Christmas in July”. This retreat was held in a very cold place and so the theme was appropriate. Luckily for me, and the women attending, the venue was toasty-warm and we only had to brave the cold outside temperatures rarely.
One of the challenges of the Retreat was to turn a Christmas card into a small A3 (16-1/2″ by 11-1/2″) wall quilt.

The card I was allocated

The card I was allocated

We were given a card when we registered for the Retreat in the early part of the year. As usual I work best under pressure —- in other words, at the last minute. I enjoyed making up the quilt, and it always makes me  use my design and patchwork skills. We were encouraged to use the card as the starting point for the completed work.

Snowflakes

Snowflakes

I cut out snowflakes of different sizes and two colours, and ironed them to the background fabric and stitched them down.  Then I quilted around all the snowflakes.  As well I  constructed  a three-dimensional snowflake to ‘hang’ over the end of the quilt.

3D Snowflake

I found some tulle with ‘snow’ on it in my stash of non patchwork fabrics and placed it across some of the quilt – ripping it in parts (yes, it was hard to do that part!).

Tulle "snow"

Tulle “snow”

The tulle was attached loosely to the top with hand sewing and some beading with  tiny glass beads.

Threads and Beads

I am happy with the end result – no prizes won, but I liked going into the challenge and looking at all the  entries to see what others did with their different cards.

Finished - just in time!

Finished – just in time!

Tuesday Treats: Flying Geese every which way

Have you been following our Modern Quilt Welcome block of the month?

If you have, you will know that the Flying Geese block was the last block to be added to the quilt.

Well that block really gave me an “Attack of the Guilts”.

I knew I had a little Flying Geese quilt top sitting in the cupboard somewhere, just waiting to be quilted. It took a little bit of searching but I did eventually find it among the “almost finished” projects.

A topsy turvy Flying Geese layout.

A topsy turvy Flying Geese layout.

It was made many years ago, as a shared friendship group activity where we all made a set of blocks for each other, in fabrics and designs of each members choice.

I had wanted a flying geese quilt for a long time so it was the perfect opportunity for us to test out a clever piecing technique. You will find the instructions on the Martingale blog: Fast and Furious: Four-at-a-Time Flying Geese by Carrie Nelson

So here it is, still not quite finished, but I have now picked out a backing fabric and almost settled on the thread choice for quilting.

I am happy with the pink for quilting the border but should I use the light medium or dark blue for quilting the back ground around the “geese”?

Decisions made, now I just have to quilt!

Decisions made, now I just have to quilt!

When I showed the quilt top to Ladybirdee she said that the first quilt she ever made was a miniature Flying Geese.

Ladybirdee's miniature Amish style Flying Geese Quilt

Ladybirdee’s miniature Amish style Flying Geese Quilt

To quote Ladybirdee:

This Amish flying geese was made about 20 years ago – when I knew very little about patchwork, and even less about foundation piecing.  Colours were shaded, but have dulled over the years.   Sometimes when we start our patchwork journey we attempt things that are not beginners work (but we don’t know that) – and some success can follow!

You will have read her posts here each month, so you know how successful she has become since stitching her first project.

Please tell us about your first quilt project.

Is it finished or is it still a work in progress?

What did you go on to make after that first project?

We love to hear about your projects, so do share a comment with our readers.

Not for the Faint Hearted

Everyone who reads my contributions to Always Playing With Thread, knows I can’t resist a good BOM (Block of the Month).  They always seem so ‘do-able’.  You only have to make one block per month and then before you know it, you have made a quilt top.

Esther Aliu, a designer, teacher and artist extraordinaire, has begun her newest BOM, Love Entwined. This is an appliqué quilt that is NOT for beginners. Over the next 18 months. I will endeavour to make my version of this exquisite quilt.

I have spent hours choosing fabric finding many pieces in my stash that contain the colours I plan to use.

Fabric for Esther Ailu's Love Entwined

Fabric for Esther Aliu’s Love Entwined

I have my background  fabric ready and I have SOME threads I plan to use as well.

A Favourite fabric with SOME Aurifil 50wt thread

A Favourite fabric with SOME Aurifil 50wt thread

The first block was challenging for me as it contains 32 TINY circles.

I am not happy with them because some of them don’t look round…as the months progress I will, no doubt, become much better at appliquéing small pieces.

Finished (but not perfect) Compass

Finished (but not perfect) Compass

But for now I will continue on and attempt to keep up.

Wish me luck!

If you would like to join the challenge of Esther Aliu’s Love Entwined, go to www.estheraliu.blogspot.com.au.

Time is running out: enter your progess photo now to win an Aurifil thread pack

Have you been following (& making) our Modern Quilt Welcome block of the month?

If so, have you entered the competition by adding a progress photo to our flickr group?

The instruction for the last pieced block pattern was supplied this month. From now on the instructions will be designed to help you add embroidery, borders, sandwich & quilt the top and add a hanging sleeve and label.

So, to celebrate the “Blocks all Pieced” milestone, we set up a photo competition and time is running out to enter.

The competition closes on 31 July 2013 with the Lucky Drawer winners being announced on 2nd August.

The quilt doesn’t have to be finished, all we want is a photo to show your progress making the blocks.

I even thought that we might have had a couple of photos showing the fabrics and threads set aside with the patterns … ready and waiting for the spare five minutes to get started.

So don’t miss out on a chance to win an Aurifil thread pack.

Up load your photo now!

There are four applique blocks from which to choose for the centre of your quilt but you may remember Judysew4th told the story about why she chose a pineapple for the central applique on her quilt.

Up until then none of us here at Always Quilting had been familiar with the pineapple being used as a symbol of welcome & hospitality.pineapple-gate

So imagine my surprise this week when I joined a group visiting the Johnson Collection, a Museum house, and the guide pointed out the symbol on the gate as being a welcome …. you got it…. there was a pineapple sitting on the front gate of a beautiful old house in the middle of Melbourne.

If you don’t have a Flickr account you may send your photo directly to us to upload for you.

“Doors Open” for Patchwork

In May I was in Toronto, Canada on holiday.  It is a beautiful city and it was good to escape a Melbourne winter for some Ontario spring weather.  While in the city,  I was fortunate to find that the 14th “Doors Open” was on the weekend  I was there. At 160 different locations, private city buildings were open to the public for viewing. It was so well organised with helpful volunteer staff  in each location to give  quality information  about the structures.

Naturally, while walking through some of the buildings, I kept looking out for some designs or ideas I could use in my patchwork.   I was delighted when I saw this tiled floor

Image

Then in another building  I saw this foyer floor

Tiled floor Toronto

From another angle this pattern is more obvious

Tiled floor Toronto 2

And around every corner of every room there was another ‘quilt’ just waiting to be made with fabric!

Close up

And finally – the border for the quilt!!

Border

I am told that on 27 and 28  July, Melbourne has public buildings open for viewing http://www.openhousemelbourne.org/ .  So for those of our blog readers who live in Melbourne or will be visiting this month, it may be worth investigating.

Tuesday Treats: Quilt as you go hexagons.

I have had a number of requests for instructions to quilt -as -you -go hexagons so here they are!

You can apply theses instructions to any size hexagon you wish to make.

You need backing fabric, a contrasting feature fabric (or fabrics), fusible wadding (or non-fusible wadding and basting spray), and thread to match your backing fabric (Aurifil of course!!).  Scraps of fabric and wadding are ideal.

You use 2 hexagons, one smaller than the other.  The smaller one is the finished size. The smaller hexagon should have sides which measure 3/4 to 1 inch smaller than the large one.  Many different companies produce perspex templates for drawing hexagons, or if you’re confident you can draw your own using a compass. There are lots of instructions online.  Here is one http://www.wikihow.com/Draw-a-Hexagon

Mark and cut smaller hexagons from your featured fabric and your larger hexagons from your backing fabric.

Marking the large hexagon.

Marking the large hexagon.

For each hexagon, you also need to mark and cut small hexagons from fusible wadding and fuse onto the back of the feature fabric hexagons.

Ironing fusible wadding to small hexagons.

Ironing fusible wadding to small hexagons.

I like to use a quilting ruler and mark 3/4” from the edge on the top side of the backing hexagon.  This helps me to centre the small hexagon and have even seam allowances.

Marking the position of the small hexagon.

Marking the position of the small hexagon.

Place the small hexagon and the large hexagon together, wrong sides together with the fused wadding between, making sure that the small hexagon is centred.

Finger press a 1/4” seam towards the centre, all around the edge of the large hexagon , then fold over and pin in place.

Ready to sew.

Ready to sew.

Be careful to make neat corners – I like to ensure my corner seams all face in one direction (either clockwise or anti-clockwise).

Turning over the corners.

Turning over the corners.

Now sew all the seams in place from the front.  To do this I use the same stitch I use to sew down quilt bindings, making sure to add a couple of stitches into each corner to secure.  I use Aurifil Cotton Mako 40 for this task.

Stitching the edge.

Stitching the edge.

Securing the corner.

Securing the corner.

Make as many hexagons as you require in this way.  To join them together, place two hexagons right sides facing, making sure corners are exactly matched and whip stitch together using very small stitches and trying to take only a small “bite” into each hexagon.  Small stitches and small bites mean that you have a very neat appearance on the right side, with your stitches hardly visible!

Whip stitching hexagons together.

Whip stitching hexagons together.

This is all you need to do to make your quilt or item, but there are additional embellishments for those who are keen!!

You can add a row of quilting around the edge as I have done in the photo, or indeed quilt an appropriately sized motif in the centre.  My thread of choice here is Aurifil Cotton Mako 12.

Quilt as you go hexagonsblog post 008

Quilting stitch around the edge.

You can also embroider along the joins if you wish.

Adding embroidery.

Adding embroidery.

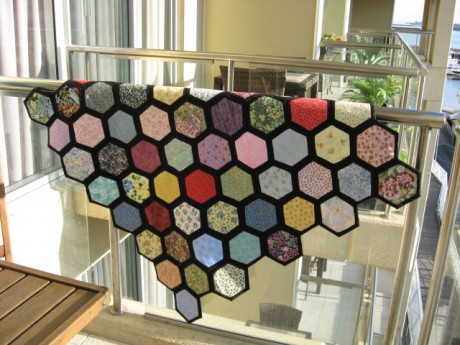
When joining  hexagons together to make a quilt you can leave the edges as they are or make half-hexagons to fill in the spaces.  In the scrappy quilt  in the photo I have left the edges as they are.

Scrappy hexagon quilt.

Scrappy hexagon quilt.

There are many other possibilities for quilt as you go hexagons.  I have made a couple of hexagon bags using a Patchwork with Busyfingers pattern.

A friend is making small quilt as you go hexagons into mug bags.

The finished hexagon bag.

A hexagon bag.

If you haven’t tried this technique have a go! It’s a great way to use your scraps of fabric and batting.

A Modern Quilt-Month 5/Come Fly With Me…..

July is here already and we are ready to take off…with our Flying Geese. This is the last pieced block we will make for our Modern Quilt top.

Make 4 Flying Geese Blocks

Make 4 Flying Geese Blocks

Barbara Brackman’s Encyclopedia of Pieced Quilt Patterns “dates the first flying-geese patterns ever published back to 1894”. It is still one of the most popular pieced blocks in quilt making because of its versatility.

Flying Geese

Flying Geese

This month we will  make 4 of these blocks and fill in the gaps of our quilt top grid.

A Modern Quilt Month 5

A Modern Quilt Month 5

Directions are provided as a free download as they are every month. These directions are written to utilize the beautiful charm square collections that come from the fabric companies cut in 5″ squares.

If you are making A Modern Quilt from your fabric stash you may want to have a look at www.quilterscashe.com. Marcia Hohn provides directions for several other methods.

Collect the Flying Geese Instructions this month and start stitching. (You do not need to register or “sign in” to access the patterns using this link. Once the page opens, simply use the “More Options” arrow, to the right of each file, to preview or download that file)

There will be several chances to win some wonderful lucky draw prizes just by uploading photos of your WIP (Work in Progress) after Month 5 (THIS MONTH) and again with photos of your finished top after Month 10!

Go to  Flickr to join our Block of the Month group and upload photos of your work.

Upload a photo of you quilt to win one of these Aurifil thread packs

Tuesday Treats: How do YOU trim a triangle?

If you have been following our Welcome Quilt block of the month you know that several of the blocks in the quilt use Half Square Triangle (HST) units.

Half Square Triangle

Half Square Triangle

This HST building block unit gives you access to a multitude of design options but it is critical to get the diagonal line as accurate as possible when trimming.

I’ve always pressed the square open, then used a small square ruler to align the diagonal line with the seam line, before trimming the square to size.

So I found the technique displayed in the “More than One Way to Skin a Triangle?” post very interesting.

Sarah demonstrates a different method, trimming the blocks to size before pressing them open, that will still keep the diagonal seam line accurately positioned from corner to corner.

However, she does highlight a possible point  where errors could occur if you have used a thick thread for piecing the blocks.

So do read the instruction fully before attacking your squares with the rotary cutter & ruler.

I was pleased to see that she mentioned that you should not need to use the “scoot” adjustment if you are piecing with a fine thread such as Aurifil Cotton mako’ 50 (or Mako’ 40).

Half Square triangle units are a great design unit

Half Square triangle units are a great design unit

The next step in the making of the Modern Welcome Quilt will be posted later this week.

There are still a few more sets of instructions to be posted so don’t forget to come back on the first Friday each month.